In this easy-to-follow tutorial, we'll take you by the hand and show you how to seamlessly integrate Bluetooth Low Energy (BLE) into your Expo applications. Get ready to unlock the full potential of BLE and take your app development to the next level!

As a seasoned developer, I can confidently say that working with wireless peripherals is one of the most exciting aspects of mobile development. There's something truly mesmerizing about watching devices like heart rate monitors, weight scales, and gyroscopes seamlessly communicate with your phone over the air.
One of the most effective ways to bring wireless communication to your app is by harnessing the power of Bluetooth Low Energy (BLE). In this article, I'll guide you through a step-by-step tutorial on how to integrate BLE into your app.
To make it easy for you to follow along, I've made the Expo code available on GitHub. You can find the complete solution on the "main" branch and a starter template on the "starter" branch. Feel free to adapt the examples to your BLE device, or if you have an Arduino Uno R4 Wifi, you can flash it with the code from my GitHub repo.
By the end of this tutorial, you'll have a working BLE-powered app that's sure to impress. Let's get started and unlock the full potential of wireless communication!
The mental model of Bluetooth Low Energy
Before doing any coding, we first have to speak the language of BLE. This means getting familiar with its basic concepts and how the different pieces of the LE model fit together. The key terms here are:
- Central - any device that consumes data from a BLE Peripheral. In our case, this is always going to be your Expo app.
- Peripheral - device that gathers data and sends it back to the Central. Examples of this might be Heart Rate Monitors, Weight Scales and Gyroscopes.
- Characteristic - a source of data that a peripheral exposes to the central.
- Service - collections of characteristics that dispense similar data.
The process for initiating a BLE Connection is as follows:
- The central scans for peripheral devices
- The central chooses a peripheral and connects to it
- The central subscribes to all the relevant services and characteristics
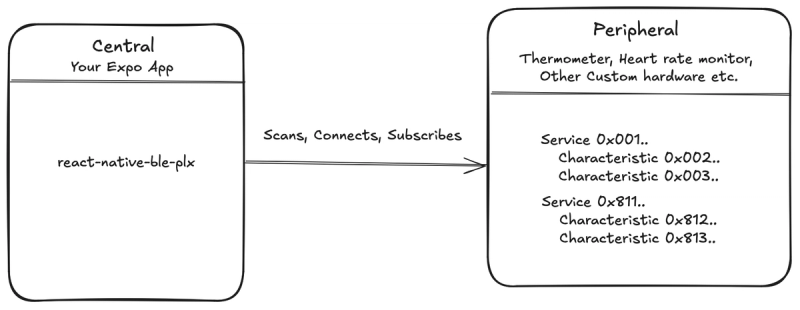
The process for initiating a BLE Connection
After this connection takes place, the Central can communicate with the Peripheral through writes and the peripheral will reply with data through Notify or Read operations
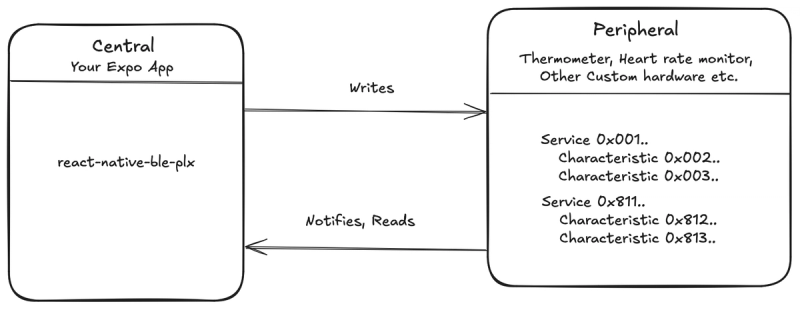
Central can now communicate with the Peripheral through writes
Configure BLE in your Expo project
For this project we are going to use the react-native-ble-plx library. You can install it using npx expo install react-native-ble-plx. In your “app.json” add the “plugins” code under the “expo” property.
{"expo": {..."plugins": [["react-native-ble-plx",{"isBackgroundEnabled": true,"modes": ["peripheral", "central"],"bluetoothAlwaysPermission": "Allow $(PRODUCT_NAME) to connect to bluetooth devices"}]]}}
What this code does is pretty simple. isBackgroundEnabled allows BLE to run for a short time while the app is backgrounded. modes allows the app to function as a central. Finally, bluetoothAlwaysAllowPermission gives the iOS permission for Bluetooth Low Energy to run within your app. At this point you’ll want to run npx expo prebuild and generate the native folders for your project.
When teaching BLE I often get the question whether we can use Expo Go or a simulator. The answer is no to both. We can’t use Expo Go because react-native-ble-plx is not included in the Go App. We also can’t use simulators because they don’t have access to Bluetooth. In order to run this project you must have a physical Android and/or iOS device and use an Expo Development Build.
Request permissions
The next thing we’ll want to do is set up runtime permissions. Android and iOS both require that the user explicitly allows you to use Bluetooth before you can scan for devices. I recommend just pasting the code below into the useBLE.ts file in the starter project. I’ll provide better commentary on the rest of the code in this article but I make an exception here because this code isn’t really related to BLE.
Writing this method mostly requires chasing down what the most recent permission constants are for BLE on Android. At the time of writing, Android 11 and earlier requires location permissions and Android 12+ (API level 31) requires the “Bluetooth Nearby” permission. iOS permissions are requested automatically. Once you are done, add this method to the top of your useBLE hook.
const requestAndroid31Permissions = async () => {const bluetoothScanPermission = await PermissionsAndroid.request(PermissionsAndroid.PERMISSIONS.BLUETOOTH_SCAN,{title: "Location Permission",message: "Bluetooth Low Energy requires Location",buttonPositive: "OK",});const bluetoothConnectPermission = await PermissionsAndroid.request(PermissionsAndroid.PERMISSIONS.BLUETOOTH_CONNECT,{title: "Location Permission",message: "Bluetooth Low Energy requires Location",buttonPositive: "OK",});const fineLocationPermission = await PermissionsAndroid.request(PermissionsAndroid.PERMISSIONS.ACCESS_FINE_LOCATION,{title: "Location Permission",message: "Bluetooth Low Energy requires Location",buttonPositive: "OK",});return (bluetoothScanPermission === "granted" &&bluetoothConnectPermission === "granted" &&fineLocationPermission === "granted");};const requestPermissions = async () => {if (Platform.OS === "android") {if ((ExpoDevice.platformApiLevel ?? -1) < 31) {const granted = await PermissionsAndroid.request(PermissionsAndroid.PERMISSIONS.ACCESS_FINE_LOCATION,{title: "Location Permission",message: "Bluetooth Low Energy requires Location",buttonPositive: "OK",});return granted === PermissionsAndroid.RESULTS.GRANTED;} else {const isAndroid31PermissionsGranted =await requestAndroid31Permissions();return isAndroid31PermissionsGranted;}} else {return true;}};
You can then export the requestPermissions function from the hook and uncomment it in the scanForDevices in App.tsx. Next, outside the useBLE hook, create a new global BLE Manager using the code const bleManager = new BleManager();. If you run the app and press connect, you should at this point see the following permission modals.
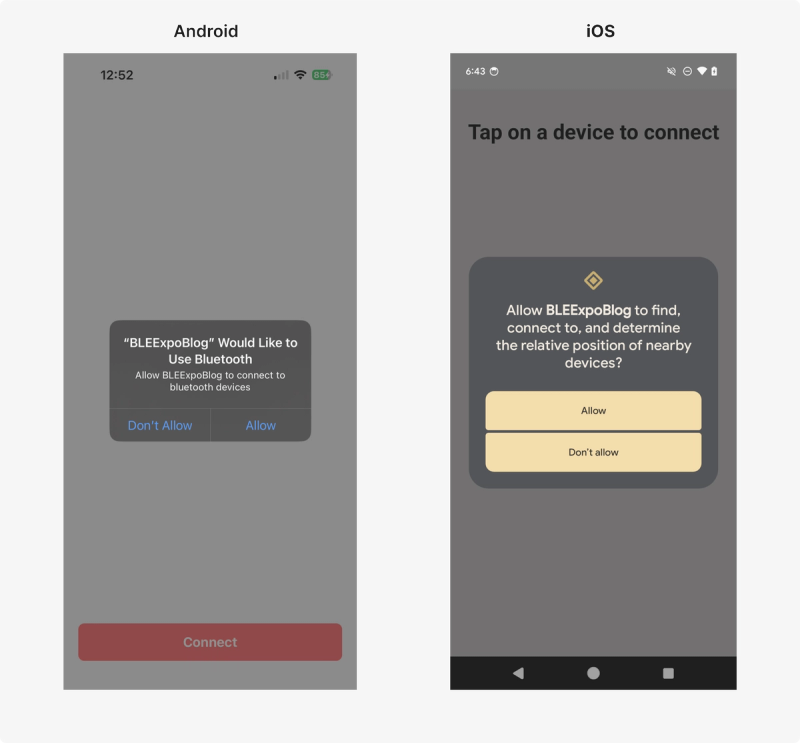
permission modals
Scan for devices
Now that the groundwork is in place we can complete part 1 of the BLE model which is scanning for peripherals. Within the hook you’ll then want to add this code:
const isDuplicteDevice = (devices: Device[], nextDevice: Device) =>devices.findIndex((device) => nextDevice.id === device.id) > -1;const scanForPeripherals = () =>bleManager.startDeviceScan(null, null, (error, device) => {if (error) {console.log(error);}if (device &&(device.localName === "Arduino" || device.name === "Arduino")) {setAllDevices((prevState: Device[]) => {if (!isDuplicteDevice(prevState, device)) {return [...prevState, device];}return prevState;});}});
The bleManager.startDeviceScan gives us a callback that is fired every time a new device is found. It’s important to filter on the devices you want to display, which is what this line does (device.localName === "Arduino" || device.name === "Arduino"). Feel free to substitute out Arduino for whatever the name of your device is. The isDuplicateDevice method just filters our duplicates. Sometimes a device can show up more than once and you don’t want it to appear twice in the state. Finally, update the setDevice setter to have the Device type.
const [allDevices, setAllDevices] = useState<Device[]>([]);
At this point you can export this method from the hook. After that you’ll want to uncomment this method in the App.tsx. You should be able to see a list of devices that looks as follows.
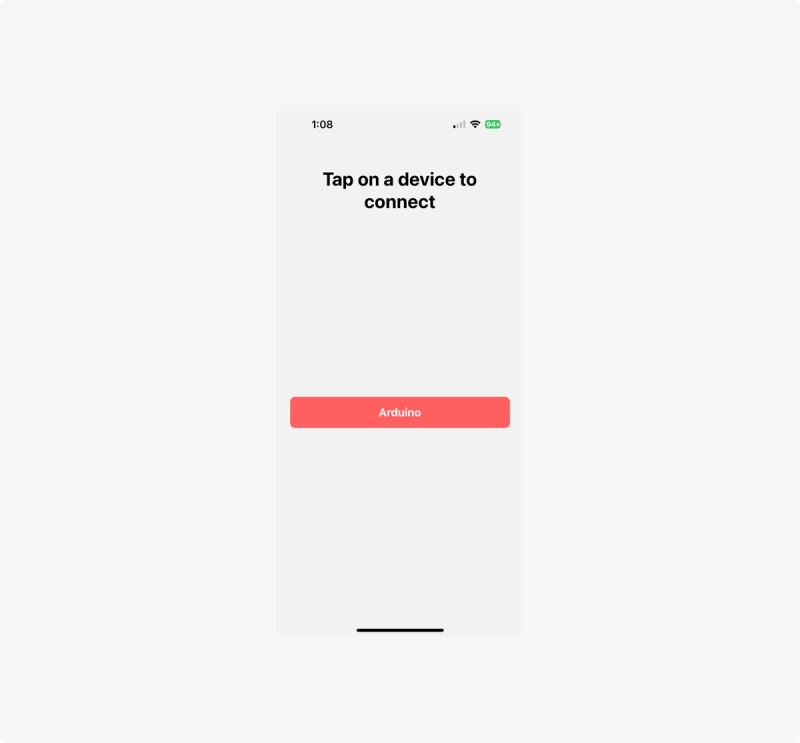
list of devices
Connect to a device
Now that we have a list of devices, we can perform the next part of the BLE model which is connecting to a device. Connecting to a device is quite simple. We are going to receive a device object from a list in the UI. When the user taps on a cell, we are going to feed the device into the connectToDevice method. Once a connection has been established I like to keep the device info in a useState just in case I need to pull additional data about the device later on.
You’ll notice after connecting we call the discoverAllServicesAndCharacteristics method. If you remember from the BLE model earlier, after scanning and connecting we needed to subscribe to the Services and Characteristics on the device. This method does exactly that. We comment out startStreamingData for now because we’re going to build that method in the next section. It does need to be called here when we are finished though. You can replace the connectToDevice stub with the functional code below.
const connectToDevice = async (device: Device) => {try {const deviceConnection = await bleManager.connectToDevice(device.id);setConnectedDevice(deviceConnection);await deviceConnection.discoverAllServicesAndCharacteristics();bleManager.stopDeviceScan();// startStreamingData(deviceConnection);} catch (e) {console.log("FAILED TO CONNECT", e);}};
You’ll also want to type the connectedDevice state:
const [connectedDevice, setConnectedDevice] = useState<Device | null>(null);
If you tap on the Arduino button now, you should be able to connect to the device.
Listen for real time events
useBLE hook.const onDataUpdate = (error: BleError | null,characteristic: Characteristic | null) => {if (error) {console.log(error);return;} else if (!characteristic?.value) {console.log("No Data was received");return;}const colorCode = base64.decode(characteristic.value);let color = "white";if (colorCode === "B") {color = "blue";} else if (colorCode === "R") {color = "red";} else if (colorCode === "G") {color = "green";}setColor(color);};
This method doesn’t do anything too exciting. First, it will log any errors if they exist. If there are no errors, you can just decode the value of the characteristic which is always in Base 64 format. You can do any other processing you want here as well since you are just adding the data to the state. Here I turn the string from the characteristic into a color.
The final step in Notify is to add the startStreamingData method which listens for real time data from the device and updates it in the onDataUpdate callback above. If you remember from above, every device has characteristics and services. I get a lot of questions about where to find this information. Only the original equipment manufacturer can give you this. There are no magical tricks to figuring it out. Normally this information comes in the form of a data sheet. In my case the data sheet would be something like this.

example of device data
I recommend taking these values and making them constants at the top of the useBLE file.
const DATA_SERVICE_UUID = "19b10000-e8f2-537e-4f6c-d104768a1214";const COLOR_CHARACTERISTIC_UUID = "19b10001-e8f2-537e-4f6c-d104768a1217";
You can then enter the following code in the useBLE hook and export it.
const startStreamingData = async (device: Device) => {if (device) {device.monitorCharacteristicForService(DATA_SERVICE_UUID,COLOR_CHARACTERISTIC_UUID,onDataUpdate);} else {console.log("No Device Connected");}}
Finally, uncomment the startStreamingData method in connectToDevice and you should see the data come through 🥳.
Next steps…
I hope you enjoyed this article and it encouraged you to add a BLE Device to your app! If you are looking to go deeper into Bluetooth Low Energy and how to make a more robust setup, feel free to check out my follow up video to this article on YouTube. It covers Bluetooth Low Energy Read, Write, Notify as well as best practices for state management.
